Take me to...
- Installed mod is not detected
- "Oops, that was not supposed to happen!"
- Long Loading Time / Content Not Loading At All (Intel Killer Networking Software)
- "Missing required disk permissions for installation"
- "This addon might be corrupt" Warning
- Visual Issues (Hardware Acceleration)
- Do you require further assistance?
Installed mod is not detected ▾
The CurseForge app is connected to the same repository as the CurseForge website, and allows many mod authors to upload their projects to it and share it with the world!
If you're using a mod that cannot be found in the CurseForge app or website, it can mean:
- That the mod is pending review by CurseForge's moderators, and should be available once it's approved (check out the working hours of the moderation team here).
Or - The project is not available in the repository, and therefore will not be detected by the CurseForge app.
Why don't certain mods get uploaded to CurseForge?
Mods and addons in the CurseForge repository are submitted and managed directly by their creators.
Some authors prefer to host their addons and mods in other sources, in which case their projects will not be available in CurseForge.
If you would like to see an addons or mods you enjoy in CurseForge, contact the authors and submit a request to them.
"Oops, that was not supposed to happen!" ▾

There are several possible causes for this issue:
Firewall/Antivirus
Firewall and/or antivirus software may block Overwolf/the CurseForge app, and thus prevent them from connecting to CurseForge's servers.
Please check your firewall/antivirus software and unblock/provide permissions accordingly.DNS Issues
To resolve any existing DNS issues that could affect the app's connection to CurseForge's servers, you can try to set/change your IPv4 DNS server address by following these steps:
Windows ▾- Open the Control Panel
- Click 'Network and Internet'

- Click 'Network and Sharing Center'

- Click the 'Change adapter settings' option in the left pane

- Right-click the network interface that connects Windows to the internet, and select 'Properties'

- Select and check the Internet Protocol Version 4 (TCP/IPv4) option
- Click the 'Properties' button

- Select the 'Use the following DNS server addresses' option
- For 'Preferred DNS server' type in: 1.1.1.1

MacOS ▾
- Open the System Preferences

- Click 'Network'

- Select your connection and click 'Advanced'

- Click the '+' at the button of the 'DNS Servers' section

- Type in 1.1.1.1

- Click 'OK'
- Relaunch CurseForge
CurseForge Plugin
At times, this issue can be caused by a certain issue with CurseForge's plugin.
To solve it, please uninstall both CurseForge and Overwolf, and reinstall them using this link.ISP Block
Certain ISPs (Internet Service Providers) may block your connection to the CurseForge domain. Please try connecting to a different network (a mobile hotspot may work as well), or try a VPN connection.IPv6
Disabling IPv6 may resolve this issue, but please note this is a last resort solution and is generally not recommended by Microsoft.
To disable IPv6, please follow these steps:- Open the Control Panel
- Click 'Network and Internet'
- Click 'Network and Sharing Center'
- Click the 'Change adapter settings' option in the left pane
- Right-click the network interface that connects Windows to the internet, and select 'Properties'
- Uncheck the box for 'Internet Protocol Version 6'

Long Loading Time / Content Not Loading At All (Intel Killer Networking Software) ▾
If the app's screens take too long to load or do not load at all, it can as a result of a connection interference, caused by Intel Killer Networking Software (or a different program similar to it).
If you have Intel Killer Networking Software installed, please make sure to install the latest available updates, then relaunch CurseForge.
If you don't have it installed, or if you require further assistance - please contact us and we will do our best to help!
"Missing required disk permissions for installation" ▾
To solve this issue, please open the menu to the right and select 'Repair folder permissions':

"This addon might be corrupt" Warning ▾
You may notice this warning message for certain addons that you currently have installed. This warning indicates that the installed addon does not match the game's current instance, or that there may be something wrong with the addon's files.

To resolve this issue, simply right click the addon and choose 'Reinstall' (or 'Update'):

If reinstalling the mod didn't help, please delete it, make sure you are currently set on the right instance (if you have more than one installed), search for the mod and install it again. If you are unable to find the mod when searching for it, it means that it's not available for your currently set instance, and is meant to be installed for a different one.
Need help resolving the 'corrupt' warning? Contact us and we will do our best to assist you!
*You may notice the 'corrupt' warning being displayed despite the addon(s) working properly in-game. We are currently investigating this.
**Please note that mods in 'Modified' or 'Working Copy' states will not get automatically updated. This is not an issue, but rather made intentionally in order to protect these mods' files from getting overwritten or deleted by updates.

***As of May 19th, 2021 a new instance of the game named 'Burning Crusade Classic' - These instructions are relevant for this new instance as well. Follow the Tooltip box instructions and click 'Update All'.

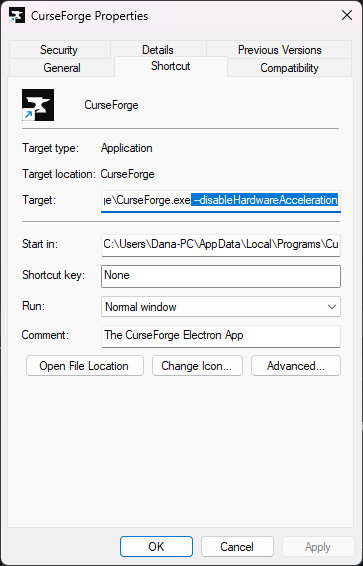
Visual Issues (Hardware Acceleration) ▾
If you're experiencing any graphic glitches in the app like flickering, visual artifacts, grainy texture or a completely blank black screen, disabling hardware acceleration could fix that.
Please try the following solutions according to the CurseForge app you currently have installed:
Overwolf
Open Overwolf's settings window and select the 'General' tab. At the bottom, you will find the hardware acceleration toggle. After toggling the option off, restart Overwolf in order for the change to take effect.

Standalone
Right-click the app's shortcut
Select 'Properties'
Select the 'Shortcut' tab
Copy the following argument (including the leading space):
--disableHardwareAccelerationPaste it to the very end of the Target line
Run the app using the shortcut
Do you require further assistance?
Please export your log files through the app, send them to us and we will get back to you shortly!
